有时相机的视野不够大,或者不需要整个产品时,为了节省时间,我们会采取合并图像操作。将图像合并成一张图像进行处理,当然也可以分开处理。工业上拼接图像比较少见(可能是我没接触到),VisionPro提供了取像操作的预处理函数,我们可以在这里进行图像拼接。

VisionPro拼接图像脚本实现代码
上图是一张被均等分为4份的图像,拼接后如上图所示。拼接代码如下:
复制
public override bool PostAcquisitionRefInfo(ref Cognex.VisionPro.ICogImage image,
Cognex.VisionPro.ICogAcqInfo info)
{
// To let the execution stop in this script when a debugger is attached, uncomment the following lines.
// #if DEBUG
// if (System.Diagnostics.Debugger.IsAttached) System.Diagnostics.Debugger.Break();
// #endif

Counter = Counter + 1;

if(Counter == 1)
{
//Create a new tool
imageStitcher = new CogCopyRegionTool();

//Create a destination image and assign it to the tool
CogImage8Grey stitchedImage= new CogImage8Grey();
stitchedImage.Allocate(image.Width * 2, image.Height * 2);
imageStitcher.DestinationImage = stitchedImage;

imageStitcher.Region = null;
imageStitcher.RunParams.ImageAlignmentEnabled = true;

//First sub-image goes into the upper left corner
imageStitcher.RunParams.DestinationImageAlignmentX = 0;
imageStitcher.RunParams.DestinationImageAlignmentY = 0;
}
else if(Counter == 2)
{
//Second sub-image goes into the upper right corner
imageStitcher.RunParams.DestinationImageAlignmentX = image.Width;
imageStitcher.RunParams.DestinationImageAlignmentY = 0;
}
else if(Counter == 3)
{
//Third sub-image goes into the lower left corner
imageStitcher.RunParams.DestinationImageAlignmentX = 0;
imageStitcher.RunParams.DestinationImageAlignmentY = image.Height;

}
else
{
//Final sub-image goes into the lower right corner
imageStitcher.RunParams.DestinationImageAlignmentX = image.Width;
imageStitcher.RunParams.DestinationImageAlignmentY = image.Height;
}

//Run the tool to add the just-acquired sub-image
imageStitcher.InputImage = CogImageConvert.GetIntensityImage(image,0,0,image.Width,image.Height);
imageStitcher.Run();

if(Counter == 4)
{
//Set the acquired image to the final stitched image
image = imageStitcher.OutputImage;

//Reset to begin a new stitched image next time
imageStitcher = null;
Counter = 0;

//Return true to inspect the stitched image
return true;

}
else
{
//Return false to skip inspection and acquire the next sub-image
return false;
}

}
实现过程很简单,首先定义了总共需要拼接多少张图像,这里是4张。然后就创建了一个空白图像区域,长宽是一张图像的两倍,也就是四张图像大小。然后根据传递过来的图像顺序,分别放在固定位置,注意,图像坐标位置以左上角计算。
上面这段脚本在工作脚本中,不是工具组脚本!选择作业内容中顶部菜单栏的配置,打开作业属性,即可看见脚本入口。
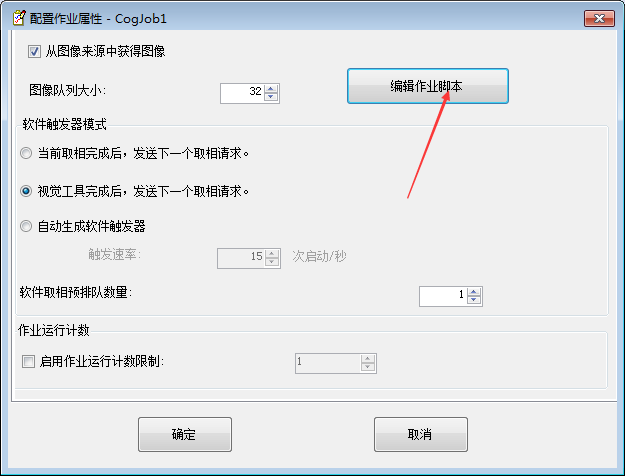
visionPro工作脚本


评论 (8)